CCC Architecture
Programs in Architectural Studies at the City Colleges of Chicago
Exercise: Container Project
Description
In this exercise you will designing a container. The container will be modeled using AutoCAD software. You will have the opportunity to practice all operations covered during the semester. Your final solution will be printed using the 3D printer.
Designing involves a series of steps or phases. The steps make up the design process. The design process includes: 1.) understanding and defining the problem to be solved, 2.) investigating possible solutions, 3.) selecting the optimal solution, 4.) modeling or visualizing the solution, 5.) refining the solution.
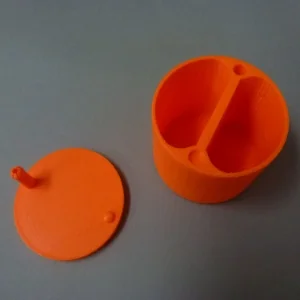
P.Grzegorzewski_container
Objectives/Outcomes and Assessment Criteria
Students will acquire and demonstrate:1.) technical competency in using software to solve a problem, 2.) sense of craft through precision and care in the presentation of the work, 3.) design aptitude in the ability to solve an organization problem and explore possible solutions, 4.) judgment in the formal articulation of a three-dimensional object and composition of two-dimensional drawings and images within a field. 5.) consideration of limitations and constraints in the problem solving process.
Part 1
CP.1.1. Review the problem limitations and conditions as described below:
- The container must be no larger than 3.5" x 3.5" x 3.5".
- The container must be able to hold something liquid or solid. Consumable (food or drink) contents are not recommended.
- We must be able to open and close the container.
P.1.2. Propose three different container contents (ex: paper clips, water, feathers). For each content propose three different container solutions. Present these to the instructor in sketch form in class. Bring the contents if necessary. Don't worry if you think you can't draw. You will be assessed on your ideas not your drawing skills.
Part 2
CP.2.1. Based on the discussion with your instructor, choose one of the proposals to develop further.
CP.2.2. Open a new file, save it and name it with your name followed by container_1. Fritz Klein would name his file FritzKlein_container_1.
CP.2.3. Discuss with the instructor the methods of 3D modeling that you plan to use to model the container. There are many ways in which to model, but some may be more appropriate or useful than others.
CP.2.4. Model the container. As you model, it is recommended that you save copies with different names. After you have completed a few steps, save the file. Then save as the next version, for example FritzKlein_container_2.
The reason for this is that some steps are difficult to undo when you are working in 3D. You may want to go back a few steps and begin from that point. It is also recommended that you generate layers to isolate construction lines and lines of the actual container.
You can also complete a few operations and make a copy of the object off to the side as shown below.
Regardless, save frequently.

CP.2.5. Review your model with the instructor in class.
CP.2.6. Make revisions as necessary.
CP.2.7. Review the model with the instructor until you have the OK to move forward.
Part 3
CP.3.1. Prepare your model for 3D printing. Thaw and turn on all layers. Erase everything but the container. Make sure that joined parts are unioned together. If you have multiple parts move the parts so they sit on the same level, preferable the bottom of all parts are at 0 on the z-axis.
CP.3.2. Make a 3D print of your model.
Part 4
Make adjustments as necessary and reprint.

.
.
.